Zoneminder security server and Raspberry Pi home automation
RPi
On my board PCB says: Raspberry Pi (c)2011.12 so it
is
Pi 1 Model B Revision 2.0 (512MB).
cat /proc/cpuinfo says it is Hardware revision 000e.
Start with NOOBS (which is based
on Raspbian) to create SD card.
Instructions
says to run gparted and format as FAT32. Another way is using dunbar
instructions fdisk -l to find your card mount point. then
sudo fdisk /dev/mmcblk0
# d -> 1 to delete partitions
# n to create partition (use default values)
# t -> b to set FAT32 format
# p to print current configuration
# w to write partition table to disc

# format card
sudo mkfs.vfat /dev/mmcblk0p1
Than just extract zip to the card.
On MAC download “SD Memory Card formatter” and do formating. Than extract and copy all content from NOOBS_v2_7_0 folder to the root of the card.
NOOBS will ask which OS you want to install. If you preferr to have ready to go sd card, than download RASPBIAN STRETCH LITE.
On Mac use Etcher https://etcher.io/ and select zip and sd card and click Flash. When installing Raspian it took around 20mins to extract 4.138MB (speed 2MB/s). On another C10 cards: Kingston 16GB MicroSD HC C10 SDC10/16GB speed is 9.9MB/s and ScanDisk Ultra 32GB 10 UHS I speed is 15MB/s so 2018-06-27-raspbian-stretch-lite.zip (367MB, uncompressed in Etcher says it is 1.86GB) took only few mins.
Create empty file ssh in the root of sd card (now sd card has name boot) so
than ssh will be enabled and you do not need mouse and monitor, just find ip
address and ssh to it.
Run sudo raspi-config in console or find in Top Left Icon -> Preferences ->
Raspberry Pi Coonfiguration -> Tab System.
If you install Desktop version of Raspbian than change Boot options to To
Cli instead of To Desktop, (in raspi-config set to B1 Consolle Autologin).
If you want to enable Desktop again, run startx when you are logged in and
attached keyboard (can not run startx remotelly from ssh). Note that startx is
not available in lite stretch, but you can install with
sudo apt-get install --no-install-recommends xserver-xorg xinit raspberrypi-ui-mods
# also to start chromium in kiosk mode
sudo apt-get install chromium-browser
startx /usr/bin/chromium-browser http://www.google.com/ --window-size=1920,1080 --start-fullscreen --kiosk --
You can see current value when you select for example 5 Interfacing Options ->
P7 1-Wire -> Would you like the one-wire interface to be enabled? and
current focused value <Yes> or <No> is current value.
If you did not enable ssh with touch ssh on the root sd card, than enable on
tab Interfaces (in raspi-config Interfacing Options -> P2 SSH) enable SSH.
Find ip address with nmap 192.168.0.-. Connect from your desktop ssh
[email protected] (password raspberry).
If something is not working than check
/etc/network/interfaces and /etc/dhcpcd.conf (you can manually get dns with
sudo dhclient eth0).
Set up static IP address using GUI, right click on Network Icon -> Wireless and
wired network setting -> Configure Interface -> Select eth0 -> IPv4 address 192.168.2.6, disable IPv6, Router 192.168.2.1 DNS servers 8.8,8,8.
or using command line edit /etc/dhcpcd.conf.
# /etc/dhcpcd.conf
interface eth0
inform 192.168.2.6
static routers=192.168.2.1
static domain_name_servers=8.8.8.8
noipv6
Leave /etc/network/interfaces as default.
Some posts about all network configuration that you need to know
https://raspberrypi.stackexchange.com/questions/37920/how-do-i-set-up-networking-wifi-static-ip-address/74428#74428
https://wiki.debian.org/NetworkConfiguration
https://wiki.debian.org/NetworkManager
# find ip address and network mask
ip -4 addr show | grep global
#    inet 192.168.2.6/24 brd 192.168.2.255 scope global eth0

# find default route
ip route | grep default | awk '{print $3}'
# 192.168.2.1

# find dns server (usually same as router)
cat /etc/resolv.conf
# nameserver 8.8.8.8
# /etc/resolv.conf is overwritten by resolvconf, network-manager and other dhcp
# clients.

# list interfaces even they are not connected
ls /sys/class/net/

# to set static ip address you can edit either /etc/dhcpcd.conf
interface eth0
   static ip_address=192.168.2.6/24
   static routers=192.168.2.1
   static domain_name_servers=192.168.2.1

# or edit /etc/network/interfaces
auto eth0
iface eth0 inet static
        address 192.168.2.6
        netmask 255.255.255.0
        gateway 192.168.2.1
Copy ssh keys with ssh-copy-id [email protected].
Check internet connection with
host google.com
ping http://www.google.com
Ruby
Check if ruby is already installed in latest Raspian.
sudo apt-get install ruby
# this is needed for eventmachine gem
sudo apt-get install ruby-dev
ruby -v
Use ligth sinatra framework
sudo gem install bundler
cat > Gemfile << HERE_DOC
source 'https://rubygems.org'

gem 'sinatra'
gem 'sinatra-param'
gem 'pi_piper'
HERE_DOC

bundle
# I got error installing gems
# mkmf.rb can't find header files for ruby at /usr/lib/ruby/include/ruby.h
sudo apt-get install ruby-dev

# I got error
# project.h:116:25: fatal error: openssl/ssl.h: No such file or directory
gem install eventmachine -- --with-cppflags=-I/usr/local/opt/openssl/include

# update your Gemfile to include installed eventmachine
# gem 'eventmachine', '1.2.5'

bundle
gpg --keyserver hkp://keys.gnupg.net --recv-keys 409B6B1796C275462A1703113804BB82D39DC0E3
\curl -sSL https://get.rvm.io | bash
rvm install 2.3.0
This takes too much time, so you can revert to
sudo apt-get install ruby ruby1.9.1-dev libssl-dev
sudo gem install pi_piper
PiPiper
In irb
rvmsudo irb
require 'pi_piper'
pin = PiPiper::Pin.new(pin: 17, direction: :in)
pin.read
Errors
/var/lib/gems/2.3.0/gems/pi_piper-1.3.2/lib/pi_piper/pin.rb:24:in `initialize': Permission denied @ rb_sysopen - /sys/class/gpio/gpio11/direction (Errno::EACCES)
# you need to run as root
/var/lib/gems/2.3.0/gems/pi_piper-1.3.2/lib/pi_piper/pin.rb:23:in `close': Device or resource busy @ fptr_finalize - /sys/class/gpio/export (Errno::EBUSY)

# you need to open pin port again, but before that you need to release
# https://github.com/jwhitehorn/pi_piper/issues/30
File.open("/sys/class/gpio/unexport", "w") { |f| f.write("#{pin.pin}") }
# or
gpio unexportall
# to see all used pins
gpio exports
Bash
https://raspberrypi-aa.github.io/session2/bash.html
#   Exports pin to userspace
echo "18" > /sys/class/gpio/export

# Sets pin 18 as an output
echo "out" > /sys/class/gpio/gpio18/direction

# Sets pin 18 to high
echo "1" > /sys/class/gpio/gpio18/value

# Sets pin 18 to low
echo "0" > /sys/class/gpio/gpio18/value
WiringPi
http://wiringpi.com/download-and-install/
sudo apt-get install wiringpi
https://projects.drogon.net/raspberry-pi/wiringpi/the-gpio-utility/
gpio readall
# for pin number with gpio we use wPi numbers so instead PIN 26 use 11
# for pi_piper we use BCM (GPIO NUMBERS like GPIO07 for pin 26)
# http://www.raspberrypi-spy.co.uk/2012/06/simple-guide-to-the-rpi-gpio-header-and-pins/#prettyPhoto

gpio mode 11 out
# same as -g 7
# gpio -g mode 7 out
gpio write 11 1

# pull up resistor
gpio mode 12 up
Dallas DS18B20 temperature sensor. Connect to pin BCM 4, wPi 7, Phusical 7 and use one pull up resistor. Reading is from file.
sudo vi /boot/config.txt
dtoverlay=w1-gpio
sudo reboot
sudo modprobe w1-gpio
sudo modprobe w1-therm
cd /sys/bus/w1/devices
ls
cd 28-xxxx (change this to match what serial number pops up)
cat w1_slave
Startup run
This somehow does not work
# /etc/rc.local
sudo ruby /home/pi/home_automation/app.rb -e production
so I use ~/.bash_profile and with sudo raspi-config enable option Boot to
CLIE Autologin, Create ~/.bash_profile with this line:
# -E is needed if you want to pass env varables to sudo command
sudo -E ruby /home/pi/home_automation/app.rb -e production
# source $HOME/securiPi/start.sh
Note that this will be executed for each ssh login and it will be exited when you disconnect from ssh session.
We use prefix rvm so rvmsudo pass that env variable to
child and unbuffer so
we can read long and not wait buffer to fill in. For this command we need to
sudo apt-get install expect-dev.
Mozilla Things
https://hacks.mozilla.org/2018/02/how-to-build-your-own-private-smart-home-with-a-raspberry-pi-and-mozillas-things-gateway/
Download img and flash to sd card.
Once booted up and connected to the lan, you can connect
https://hacks.mozilla.org/2018/02/making-a-clap-sensing-web-thing/
Webpack
Follow Webpack
Disk errors
If you get Kernel panic - not syncing: VFS: Unable to mount root fs on
unknown-block that meens SD card is corrupted. Try to recover with the fsck
command on your ubuntu machine. Find your root partition of your sd card using
gnome-disks. Click on root Partition 7, and than on STOP icon to unmount it.
Than run in console (it could take 10 minutes):
sudo fsck.ext4 -fy /dev/sdc7
Program Attiny
highlowtech tutorial suggest to add board manager https://raw.githubusercontent.com/damellis/attiny/ide-1.6.x-boards-manager/package_damellis_attiny_index.json
Another installation is downloading to hardware folder. https://github.com/SpenceKonde/ATTinyCore
POE power over ethernet
From left to right, when you hold lan cable and look at pins (T568A color) pinouts. B variant is when orange and green are swapped. Crossover cable is when on one side is A and on other is B variant and it is used to connect two computers directly. When you connect computer to switch than use straight through cable (on both side is same variant).
- 1 White green
- 2 Green
- 3 White organge
- 4 Blue (DC-)
- 5 White blue (DC-)
- 6 Orange
- 7 White brown (DC+)
- 8 Brown (DC+)
https://en.m.wikipedia.org/wiki/Ethernet_extender Ethernet range is 100m, but you can use some devices to extend that range http://www.veracityglobal.com/products/ethernet-and-poe-devices/outreach-lite.aspx It is powered with POE and it can deliver POE to the other end.
ixl6009 https://electronics.stackexchange.com/questions/113253/voltage-drop-and-safe-current-load-on-cat5-cable
Zoneminder
Installation https://wiki.zoneminder.com/Ubuntu_Server_19.04_Zoneminder_1.32.3
su
add-apt-repository ppa:iconnor/zoneminder-1.32
apt update
apt upgrade
apt dist-upgrade
apt install zoneminder

echo "sql_mode = NO_ENGINE_SUBSTITUTION" >> /etc/mysql/mysql.conf.d/mysqld.cnf
systemctl restart mysql

chmod 740 /etc/zm/zm.conf
chown root:www-data /etc/zm/zm.conf
chown -R www-data:www-data /usr/share/zoneminder/

a2enconf zoneminder
a2enmod php7.2
a2enmod cgi
a2enmod rewrite

systemctl enable zoneminder
systemctl start zoneminder

awk '$0="date.timezone = "$0' /etc/timezone >> /etc/php/7.2/apache2/php.ini
# or
# sed -i /etc/php/7.2/apache2/php.ini -e '/\[Date\]/a \
# date.timezone = Europe/Belgrade'

systemctl reload apache2
http://localhost/zm/api/host/getVersion.json should return version.
curl http://localhost/zm/api/host/getVersion.json
{"version":"1.32.3","apiversion":"1.0"}
To change apache port to 81 you can change:
# /etc/apache2/sites-enabled/000-default.conf
<VirtualHost *:81>

# /etc/apache2/ports.conf
Listen 81
To trigger some functions you can run script with patch
or event server as in ZMNinja
You can export images for event: Export -> check Export Image Files and check
Export File Format Tar. When you extract you can create video file with command:
ffmpeg -i %05d-capture.jpg output.mp4
Zoneminder service starts automatically using /etc/init.d/zoneminder.
If you want to prevent automatical start on boot, you can disable using:
sudo update-rc.d zoneminder remove
To use another disk, you can mount external hard drive using “Disks” and “Settings -> Edit mount options” and uncheck Automatic Mount Options but better is to follow https://wiki.zoneminder.com/Common_Issues_with_Zoneminder_Installation_on_Ubuntu#Use_Systemd_to_Mount_Internal_Drive_or_NAS Basically we mount external drive to /mnt/sdb1 and moount /var/cache/zoneminder/events to /mnt/sdb1/zoneminder/events
To start streaming cameras on ubuntu boot startup you can add Startup Application a script
# ~/start_firefox_and_maximize.sh
firefox -url http://localhost/zm/?view=cycle &
xdotool search --sync --onlyvisible --class Firefox windowactivate key F11
Zoneminder Errors and Logs
Watch logs
tail -f /var/log/syslog /var/log/apache2/* /var/log/mysql/*

or

multitail /var/log/syslog /var/log/apache2/error.log
Motion recording works but can not see stream. Error in log
Socket /var/run/zm/zms-153908s.sock does not exist. This file is created by zms, and since it does not exist, either zms did not run, or zms exited early. Please check your zms logs and ensure that CGI is enabled in apache and check that the PATH_ZMS is set correctly. Make sure that ZM is actually recording. If you are trying to view a live stream and the capture process (zmc) is not running then zms will exit. Please go to http://zoneminder.readthedocs.io/en/latest/faq.html#why-can-t-i-see-streamed-images-when-i-can-see-stills-in-the-zone-window-etc for more information.
One old fix for ubuntu
(Web interface) Options, paths, and update PATH_ZMS from "/cgi-bin/nph-zms" to "/zm/cgi-bin/nph-zms"

That should match in /etc/apache2/conf-available/zoneminder.conf
#ScriptAlias /zm/cgi-bin "/usr/lib/zoneminder/cgi-bin"

sudo service apache2 restart
sudo service zoneminder restart
But for recent zoneminder 1.32.2 ERR [Socket /var/run/zm/zms-053522s.sock does
not exist is caused by zmupdate.pl which did some changes and generate
/etc/zm/conf.d/zmcustom.conf which override ZM_PATH_ZMS so you need to
commend that line out.
Error ‘Failed to open video device /dev/video0: Permission denied’
adduser www-data video
usermod -a -G video www-data

# chmod is not needed
# sudo chmod 777 /dev/video*

sudo reboot
If you see error:
An error has occurred and this operation cannot continue. For full details check your web logs for the code ‘F88AB7’
https://forums.zoneminder.com/viewtopic.php?t=12997
It is probably some error in database, like
[Fri Jan 25 12:25:52 2019] [error] [client 192.168.1.8] SQL-ERROR(BDC154): Table './zm/Events' is marked as crashed and last (automatic?) repair failed

[Fri Jan 25 12:25:52 2019] [error] [client 192.168.1.8] PHP Warning:  Unknown: open(/var/lib/php5/sess_31rbb6unk3hhraifv94pfqgci1, O_RDWR) failed: No space left on device (28) in Unknown on line 0
I got this error because no space left on device, specifically inodes. So I removed some files and repair mysql.
sudo apt-get autoremove
rm -rf /var/cache/zoneminder/*
Remove all data from zm with
mysql -u root -p zm
truncate table Logs;
truncate table Frames;
truncate table Events;
Error for Unable to create libvlc instance due to: (null) is fixed with
apt-get install libvlc-dev libvlccore-dev vlc
Error for small memory alocation ability
tail /var/syslog
 zmc_m2[22910]: INF [Starting Capture]
 zmc_m2[22910]: ERR [Invalid response status 401: Unauthorized]
 zmc_m2[22910]: ERR [Unable to get response]
 zmc_m2[22910]: ERR [Failed to capture image from monitor 2 (0/1)]
 zmdc[22798]: ERR ['zmc -m 2' exited abnormally, exit status 255]
 zmwatch[22830]: ERR [Can't get shared memory id '7a6d0002', 2: No such file or directory]
 zmwatch[22830]: ERR [Can't get shared memory id '7a6d0002', 2: No such file or directory]
Open the file “/etc/sysctl.conf”, and paste these lines at the bottom of the file, then reboot.
# /etc/sysctl.conf

# Increase the maximum shared memory
kernel.shmall = 167772160
kernel.shmmax = 167772160
https://forums.zoneminder.com/viewtopic.php?f=38&t=28234&p=110237&hilit=Got+empty+memory+map+file+size+0#p110237
Upgrading to master because of no image since startup
Zones
wiki has example. Use small zone for far distances so percentage is same.
- set A is full zone pixels
- set B is Min/Max pixel Threshold: difference in color from previous
- Min/Max Alarmed Area: check if set B is at least/most of set A in % I used max 50% since a car is less than that.
- set C is Filter Width/Height: check if 3x3 surround pixels (from set B) is
also different in colors
- Min/Max Filtered Area: check if C cover min/max of set A in %
- set D is Min/Max Blobs: number of blobs
- Min/Max Blob area: check if cover at least/most of set A in %
To eliminate sun shadow, you can lower the Max Alarmed Area (50%) and use Overload Frame Ignore Count to ignore next 3 frames in that case of overload.
To eliminate camera glitches, you can set in tab Source -> Monitor -> Buffers -> Alarm Frame Count to 2.
To eliminate false alarm when half of the image is triggered than use Max Alarmed Area to 50% or less.
Also you can set Preclusive zone so if sun or ir light triggers alarm on preclusive zone it will disable alarm in active zone.
Also you are using old camera in snapshot mode, zoneminder is pulling for new images, you should limit Analysis FPS, Maximum FPS, and Alarm Maximum FPS in Source -> Monitor -> General tab
You can see stats by clicking Frames -> last column is Score (on stills you can see only score on hover). For example:
| Zone | Pixel Diff | Alarm Px | Filter Px | Blob Px | Blobs | Blob Sizes | Alarm Limits | Score |
| All | 67 | 437 (5%) | 97629 (5%) | 96123 (5%) | 1 | 96123 (5%) | 813,0-1306,269 | 5 |
In filter window you can see Max score frame (last column)
To enable authentication and admin password go to options -> System -> OPT_USE_AUTH checked. Default is admin/admin.
To change password use:
mysql -u root -p
use zm
update Users set Password=PASSWORD("admin") where Username="admin";
PCI Cards
Determine
lspci -v
PICO200 https://wiki.zoneminder.com/Pico2000 PICO2000 is a quad camera input PCI card. The card uses a single Conexant 878A chip. In addition, some models have 1 audio input jack; it has not been tested with ZoneMinder. 30 FPS (degrades as the channels are utilized; expect ~2 FPS with all four channels capturing)
# /etc/modprobe.conf
options bttv card=77 tuner=4 radio=0 triton1=0 vsfx=0 autoload=0
Bt878 4chip https://wiki.zoneminder.com/Bt878_4chip_8inputs
dmesg | grep video

dmesg | grep bttv
[   21.257789] bttv: Bt8xx card found (0)
[   21.258002] bttv: 0: Bt878 (rev 17) at 0000:01:01.0, irq: 17, latency: 32, mmio: 0xf8601000
[   21.258045] bttv: 0: using:  *** UNKNOWN/GENERIC ***  [card=0,autodetected]
[   27.728037] bttv: 0: tuner type unset
[   27.735284] bttv: 0: registered device video0
[   27.737522] bttv: 0: registered device vbi0
Philips saa71xx https://wiki.zoneminder.com/Debian_Squeeze
lspci -v
04:0c.0 Multimedia controller: Philips Semiconductors SAA7130 Video Broadcast Decoder (rev 01)
	Subsystem: Philips Semiconductors SAA7130-based TV tuner card
	Flags: bus master, medium devsel, latency 64, IRQ 20
	Memory at feaffc00 (32-bit, non-prefetchable) [size=1K]
	Capabilities: [40] Power Management version 1
	Kernel driver in use: saa7134
	Kernel modules: saa7134
[   19.108345] saa7134: saa7130[0]: registered device video0 [v4l2]
[   19.212484] saa7134: saa7130[1]: registered device video1 [v4l2]
Permissions for /dev/video0 does not allow other access so change to 666
ls -ls /dev/video*
0 crw-rw----+ 1 root video 81,  0 Jun  2 06:11 /dev/video0

cat >> /etc/udev/rules.d/90-zoneminder.rules <<HERE_DOC
# allow non-privileged users to access the /dev/video* files
SUBSYSTEM!="video4linux", GOTO="zm_rules_end"
SUBSYSTEM=="video4linux",       MODE="0666",     GROUP="video"
LABEL="zm_rules_end"
HERE_DOC

# restart comp or udev rules
udevadm control --reload-rules && udevadm trigger

ls -ls /dev/video*
0 crw-rw-rw-+ 1 root video 81,  0 Jun  2 06:32 /dev/video0
To find which device is connected you can
vlc v4l2:///dev/video0
Do not use Source type Libvlc since it will use vlc, but you can use direct
access to file, so choose Local, note that new fields will show up in Source
tab.
China IP cam
When I look at the source I see
var g_SoftWareVersion="V4.02.R12.00006531.10010.143300.00000";
var g_HardWareVersion="Unknown";
var g_mBuildTime="2016/9/13 16:50:12";
var g_SerialNo="fcccccdda05ad0a9";
var g_VideoInChannel=1;
var g_AlarmInChannel=2;
var g_AlarmOutChannel=1;
var g_AudioInChannel=1;
var g_DigChannel=0;


var g_channelNumber=1;
var g_user="admin";
var g_port="554";
 var g_address =document.location.hostname;

if (g_address == "")
{
//	g_address = "10.2.4.46";
}

var iLanguage=101;
var g_passWord="";
So to set zoneminder you can use “ONVIF” link at the top or manually select:
- Source Type -> Ffmpeg
- Source Path -> rtsp://admin:@192.168.1.11:554/user=admin_password=tlJwpbo6_channel=1_stream=0.sdp?real_stream
- Remote Method -> TCP
- Capture Width: 1280, Capture Height: 960
ON/Vif gives some options: Main stream H264 1920x1080 @ 30fps, secondStream 720x480 @ 30fps, thirdStream 352x288 @ 15fps
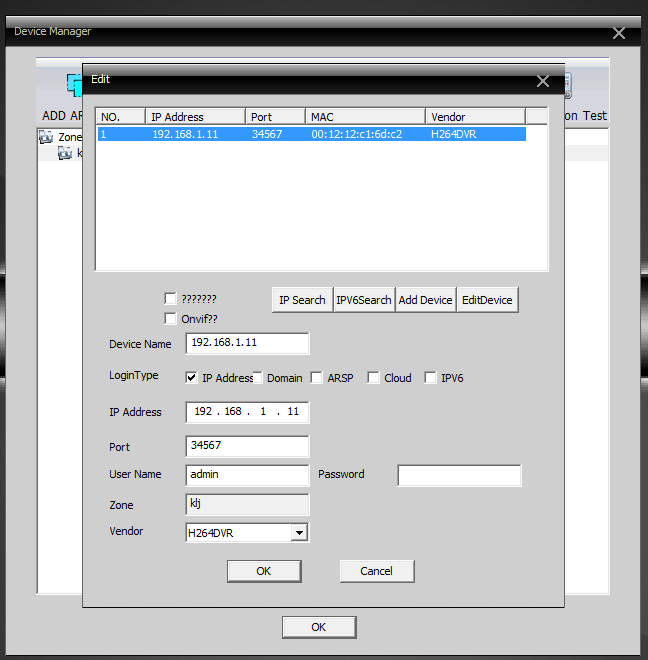
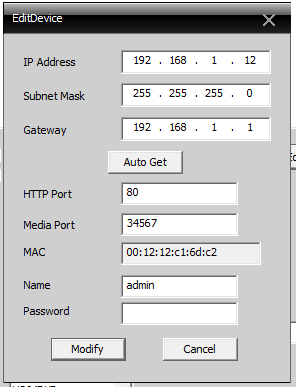
IPC-Model vendor is H264DVR, media port 34567, IP address: 192.168.1.11. You can search, just type 192.168.1. (blank). Or you do not need to type address, it will find cameras on other subnet mask. You can change ip with “EditDevice”
Dahua IP Cam
IPC-HDW4300C Dahua IP dome 3MP Camera HDW4300C Built-in MIC Metal body POE CMOS IR 30m IK10 1080p IP66 security cctv Camera IPC-HDW4300C Lens (mm):3.6mm Default IP address for Dahua cameras is 192.168.1.108 media port 3777 MAC 3c:ef:8c:a3:c9:6b, vendor Dahua, username: admin, password: admin. Also have RTSP port 554. You can change seetings on http://192.168.1.108/ on Ubuntu dahua ipc-hdw4631c-a spens 250mA without IR and 270mA with ID diodes.
Zoneminder ONVIF , subtype=0 (mainstream profile is H264 2592x1944 @ 25fps), use subtype=1 for smaller screen (704x576) rtsp://admin:[email protected]:554/cam/realmonitor?channel=1&subtype=0&unicast=true&proto=Onvif rtsp://admin:[email protected]:554/cam/realmonitor?channel=1&subtype=1&unicast=true&proto=Onvif
Cantonk IP Dom
KIP-200SHT30H (on web page it shows Herospeed) http://www.elementa.rs/proizvod/57087/ip-dom-kamera Objektiv: varifokalni, 2.8-12mm Horizontalni ugao vidljivosti: 21° do 81°
Defalut ip http://192.168.1.168 admin/admin. You need to use windows to edit configurations, there is basic setup, to set up manual IP address. Under System there is Time Settings to set TimeZone.
KIP-200SH20H https://www.elementa.rs/proizvod/57086/ip-dom-kamera On camera it shows Cantonk. Focus: 3.6mm, 68° Default ip is 192.168.1.168 Current is only 90mA (this is really low for ip camera), With IR diodes it is 360mA.
Profiles (resolution is fixed so you need to choose one of these three) MainStrean H264 1920x1080 @ 30fps rtsp://admin:[email protected]:80/0 secondStream H264 720x480 @ 30 fps rtsp://admin:[email protected]:80/1 thirdStream H264 352x288 @ 15 fps rtsp://admin:[email protected]:80/2
China IP camera $23
Find camera ip address using nmap 192.168.2.- or Zoneminder ON/VIF.
Connect using Windows IE (install plugins, chose english, username: ‘admin’,
password: ‘’ empty)
- set timezone
- set fix ip address 192.168.3.6
China Mini IP camera without box
https://www.aliexpress.com/item/1280-720P-1-0-MP-1-3MP-Mini-IP-Camera-ONVIF-indoor-Plug-and-Play-support/32801033646.html?spm=a2g0s.9042311.0.0.27424c4dIrwbGp
Lead acid
WP7.2 28W has a 7.2Ah on 12V. ie can provide 0.36A for 20h.
Charging is limited to 2.4V per cell (6x2.4 = 14.4v for 12v battery). Current is 10% of capacity, 0.1C (0.7A for 7Ah). Stop charging when current is below 3% of capacity (0.21A for 7Ah), or after 16hours time (time to charge depends on current, if it is 10% than it need 10 hours). Slow charging is 2.25V per cell (6x2.25 = 13.5V for 12v battery). Best option is to start with 14.4V and decrease to 13.5V when battery is full. Battery needs charge when it is below 12.5V in open circuit. Battery is fully discarged when is it below 9.5V (do not go this far). Battery is around 2.15V per cell when is fully charged 12.91V for 12V battery. Wait for 12hours after charging to measure open circuit.
Default Passwords
Telekom: admin ztonpk
POE
Long cable on battery power
For long cable, best advice is to use two switches on both ends and than attach wifi to those switches (switch works great for those big cables).
Mikrotik RB 750 use 90mA + 10ma for each port, so ~ 150mA when all cables are there. There is no difference while there is a traffic or inactive network.
Planet AP is 260mA.
Both network devices are 400mA.
Cheap china white ip camera spends 260mA if all diodes are on and streaming (253mA no streaming). During the day, witout IR diodes, it spends 100mA (87mA when there is no streaming). Cheap china ip camera without box and ir diodes spends ~140mA. Cantonk spend ~90mA
So on second batery you can connect two cameras.
Stream
You can open rtsp stream in vlc player. You can stream inside html page using https://wiki.videolan.org/Documentation:WebPlugin
but plugin is not supported any more https://forum.videolan.org/viewtopic.php?t=138044
Alternative is https://github.com/Streamedian/html5_rtsp_player
npm install git://github.com/Streamedian/html5_rtsp_player.git
To search for onvif devices in ruby you can use: https://github.com/Caldis/Ruby-Onvif/blob/master/examples/test_device_discovery.rb based on https://github.com/jimxl/ruby-onvif-client
To stream screen recordings you can download https://www.tightvnc.com/download.php vnc server (default configuration is enough). Run Server in Application Mode.
Yi IOT camera
https://www.aliexpress.com/item/1005005426848727.html
model number A1214 does not support smart home platform and any of the hacks. Other cameras could support hacks like https://github.com/roleoroleo/yi-hack-Allwinner-v2 https://github.com/roleoroleo/yi-hack_ha_integration Also Home assistant https://www.home-assistant.io/integrations/yi/